


What is Photoshop Action :
Photoshop action is a record of work in Photoshop - in Photoshop action we can record our work step by step and that recorded work we can use on another photograph. for example i have a opened Photograph in Photoshop and i want to increase contrast and brightness of that photo, so i will record my work of increasing contrast and brightness and that recorded action i can use on another photograph by one click or by shortcut key.
The above situation is only just example, we can record many work in action for i.e. pp action, collage action, effect action, photo re-sizing action etc.
How to record Photoshop Action :
For record a Photoshop action we will record a action step by step, you can easily understand from this example about recording a Photoshop action, see below steps carefully and use in Photoshop :-
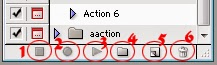 |
| Image 01. Action bar |
- Open adobe Photoshop, open any photo in Photoshop.
- go to windows menu and select action OR press Ctrl+f9 (if your action bar not appearing it will be appear)
- See Image 01 Action bar. this is bottom of action bar there is 6 buttons. button no. 6 is for Delete any action or folder. Now we will create a action click on button no. 4 , this button is use for create folder, so create a folder, give folder name and click OK.
- Next select your created folder and Click on Button no 5 for create new action. a new window will be appear look like bellow :

image 02 - Name: give the name of action, set : your Folder set here, Function key : select any function key with shift/control or Both, this key is shortcut for your action. and click on record button.
- Now your work recording in action, set level,set brightness and contrast, go to image menu- select image size set new size of image, etc. now press button no. 01 for stop recording. your recording looking like this :

image 03 - see above image 03, action 25 have 3 work level... etc. now when you will click on button no 3 by selecting of action 25 then those 3 work will apply on selected layer or document.
- see the above image 03 there is a another red round with A and B Number, by clicking on A that work will not work (click on A Level not work on action) and B is for toggle dialog , means by clicking on B red round action will ask you every time to how many brightness/contrast give in layer.
- so that's all about action, now you may create your own action for easy work Or you can download recorded action also (i.e. pp action) for download pp action go to below download post :
Related :
click here for Download passport size photo action
share your experience in comment box, discus your questions (if any) in comment box -
share your experience in comment box, discus your questions (if any) in comment box -

No comments:
Post a Comment